Recently, one of our clients had a scenario that required them to keep track of the proxyAddresses attribute history between two Microsoft Active Directory (AD) domains. Since FIM Sync Service doesn’t retain any history of attribute values (as simply a state-based synchronization engine), this required a bit of thought and planning.
Examining the need to keep track of the history and exploring options, we came down to the solution through a simple one-revision history mechanism with FIM Sync.
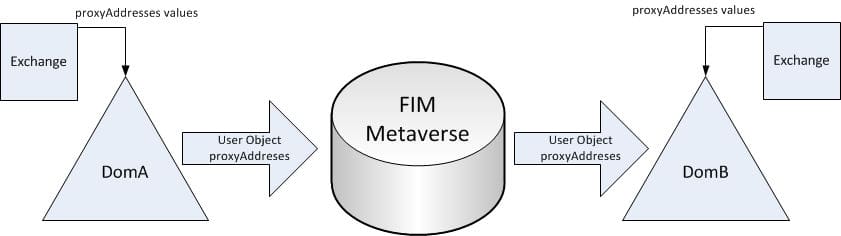
Without getting into too much history, let’s start with a brief overview of the scenario. There are two Active Directory (AD) domains (let’s refer to them as DomA and DomB) and users are being synchronized from DomA to DomB. Where it gets a little complicated is that each domain has its own Exchange environment, and each adds unique values to the proxyAddresses attribute of mail-enabled user objects. With this setup – the Sync engine would normally overwrite the values in the proxyAddresses attribute in DomB, in essence deleting any values added by the DomB Exchange environment (see Figure 1).
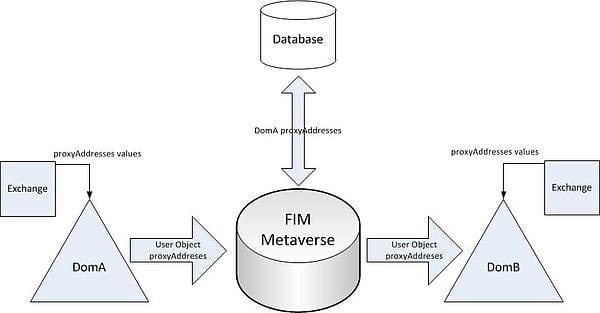
So, in this instance, we needed a way of adding values from DomA without overwriting any values added by DomB. To accomplish this, we would need to store the latest values from DomA somewhere. Putting them into a SQL database, we were able to bring them back into the Metaverse as a different attribute. This was a good solution because we would need to reference them during the synchronization process, and the built-in SQL Management Agent (MA) from FIM would allow us to easily write and retrieve the values to and from the SQL database (see Figure 2).
With the DomA values in the database, we could refer to them if the values in DomA changed. The changes would flow in from DomA, we would apply the logic we needed in the out-bound sync to DomB by referring to the new values from DomA and the previous DomA values (now stored in both the SQL database and a new attribute in the Metaverse). This would give us a one-revision history, which is all we needed.
To set this up; we needed to add the following items to our FIM Sync infrastructure:
- Two new tables to hold the proxyAddresses values (if this were a single-value attribute, we would only need one table, but because it is multi-valued we need two – one to hold the record, and one to hold the record’s multi-values).
- A new attribute in the FIM Metaverse to hold the one-revision history of the proxyAddresses values from DomA (we will call proxyAddressHistory) .
- A new SQL MA to interface with the new table(s).
- A new bit of provisioning logic to create the new entries in the SQL table.
- New export logic in the DomB MA for the proxyAddresses attribute
For our setup, we used the same SQL instance that was in place for the FIM Synchronization Service. We had previously created another database (called FIMExtension), so we added the new tables for the proxyAddresses history there.
For the main table (let’s call it ProxyTracking), you really only need one column to hold the primary key. I like a little more info, though, so that I have an idea of what I am looking at in the database if I ever view the data from there. You can make this more (or less) complex, but for the purposes of this blog entry we will just create the table to hold a primary key (P_ID) and an employeeID.
(
P_ID int PRIMARY KEY IDENTITY,
employeeID (15) NOT NULL,
);Now, we will need another table to keep track of the values stored in the multi-valued attribute proxyAddresses. Let’s call it ProxyTrackingRef. For this table, we need a column that refers back to the ProxyTracking table’s primary key (P_ID), a column to hold the name of the attribute we are tracking (in our case it will always be proxyAddresses), and a column to hold the values of the proxyAddresses.
(
P_ID int NOT NULL,
attributeName varchar(20) NOT NULL,
attributeValue varchar(100) NOT NULL
);
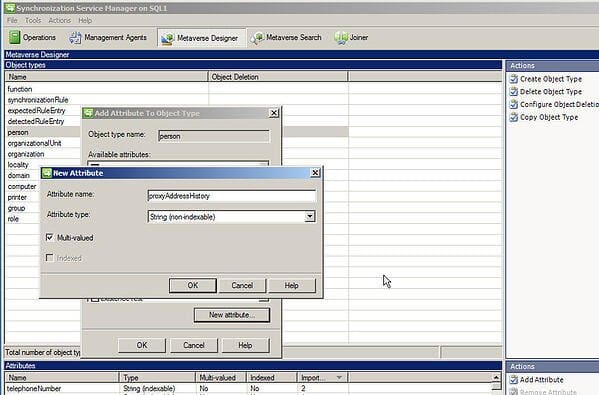
Now we need to create the new attribute in the FIM Metaverse to hold the one-revision history. From the FIM Sync Metaverse Designer, add a new attribute to person called “proxyAddressHistory.” Make it multi-valued string, non-indexable (see Figure 3).
Next, we need an MA to read from and write to the SQL tables we just created. From the FIM Sync Management Agents tab, create a new SQL Server MA called “Proxy History MA.” Specify the SQL server instance that holds our database and new tables. Type in “ProxyTracking” for the Table/View, and “ProxyTrackingRef” for the Multivalue Table option (see Figure 4 below).

Figure 4 – Create the SQL MA
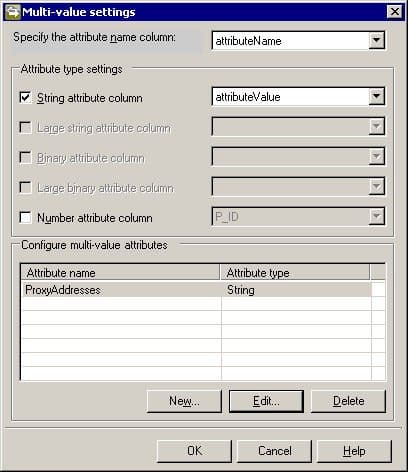
On the “Configure Columns” section, make sure that the P_ID column is set as the Anchor. Click the Multi-value button and select “attributeName” from the drop-down for the “attribute column name”, click “String attribute column” and choose “attributeValue” from the drop-down, and click the New button and add “ProxyAddresses” as a new multi-value attribute as Type “String” (see Figure 5 below).
There is no need to worry about Connector Filters or Join and Projection Rules.
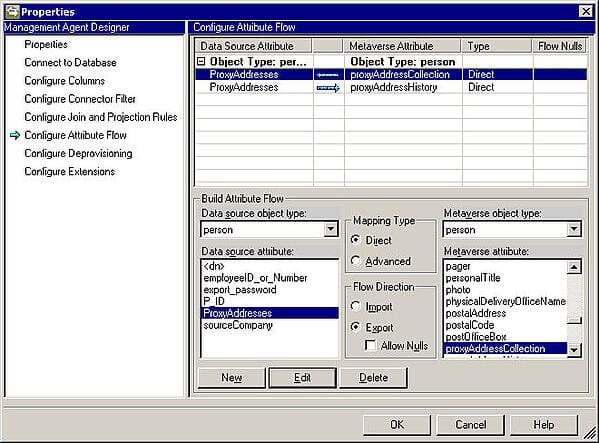
In the “Configure Attribute Flow” section, setup a direct export flow from the Metaverse attribute proxyAddressCollection (this is where we are storing values from DomA) to the SQL MA attribute ProxyAddresses, and a direct import flow from the SQL MA attribute ProxyAddresses to the Metaverse proxyAddressHistory attribute (that we previously created) (see Figure 6 below).
In the “Configure Deprovisioning” section stage a delete on the object for the next export run, and make sure that a Rules extension name is listed in the “Configure Extensions” sections (Proxy History MAExtension.dll).
Create Provisioning Logic for the Proxy History MA
Now we need to create the provisioning logic in the MVExtension.dll (if you have not already enabled the Provisioning Rules Extension, you will need to do so from the Tools, Options menu). First, create a subroutine called “ProvisionToProxyHist” (as below).
Sub ProvisionToProxyHist(ByVal mventry As MVEntry)
‘——————————————-
‘– Subroutine to provision to the SQL table that holds the proxy history
‘——————————————-
Try
Dim PHistMA As ConnectedMA = mventry.ConnectedMAs(“Proxy History MA”)
If PHistMA.Connectors.Count <> 0 Then Exit Sub
Dim obCS As CSEntry
obCS = PHistMA.Connectors.StartNewConnector(“person”)
Dim DN As ReferenceValue
DN = PHistMA.EscapeDNComponent(System.Guid.NewGuid().ToString)
obCS.DN = DN
obCS.CommitNewConnector()
Catch ex As Exception
Throw ex
End Try
End Sub
Then, all we have to do is call that subroutine from within the Provision() subroutine of the MVExtension.dll (as below).
‘To ProxyHistory MA
ProvisionToProxyHist(mventry)
With this in place, and the attribute flows we specified in the MA above, the proxy history information will be sent to the SQL tables.
Setup Export Logic for DomB
To use the new history when exporting to the DomB domain, we need to do two things. First, we need to modify the Export flow from the Metaverse to DomB and change it from a direct flow to an advanced flow (rules extension) with both the proxyAddressCollection and proxyAddressHistory selected as Metaverse attributes to the DomB proxyAddresses attribute (I specified the flow rule name of “proxyAddressCollection_proxyAddressHistory_to_proxyAddresses”).
Next, we need to add that flow rule name to our Case statement in the DomB MAExtension.dll’s MapAttributesForExport() subroutine as below.
Case “proxyAddressCollection_proxyAddressHistory_to_proxyAddresses”
‘Add any smtp entries from the
‘MV proxyAddressCollection without overwritting target entries
‘If there is no proxyAddressCollection in the MV then no need to continue
If Not mventry(“proxyAddressCollection”).IsPresent Then Exit Sub
Dim aOrigCSProxyAddresses() As String = {}
Dim sp1(), sp2() As String
Dim bExists As Boolean
‘Grab the DomB connector space values so we can add unique values back
If csentry(“proxyAddresses”).IsPresent Then
aOrigCSProxyAddresses = csentry(“proxyAddresses”).Values.ToStringArray
csentry(“proxyAddresses”).Values.Clear()
End If
‘… Logic to add specify/add primary (SMTP) address needs to go here
‘… — …
‘… — …
‘Next, add smtp addresses from the metaverse to the outbound attribute
For Each pAddr As String In mventry(“proxyAddressCollection”).Values.ToStringArray
If pAddr.StartsWith(“smtp:”) Then
‘Add smtp(s) that dont already exist in the list
bExists = False
‘loop through each entry in the proxyAddresses
For Each csPAddr As String In csentry(“proxyAddresses”).Values.ToStringArray
‘split the two values we are comparing on the colon (:)
sp1 = Split(csPAddr, “:”)
sp2 = Split(pAddr, “:”)
If sp1(1).ToLower = sp2(1).ToLower Then
‘the address values match
‘set the flag to true
bExists = True
‘no need to continue through the list, exit the loop
Exit For
End If
Next
‘if no match was found, go ahead and add the value to the list
If Not bExists Then csentry(“proxyAddresses”).Values.Add(pAddr)
End If
Next
‘Now replace any entries from the CS that aren’t in the MV from DomA
If aOrigCSProxyAddresses.Length > 0 Then
For l As Integer = 0 To aOrigCSProxyAddresses.Length – 1
‘First, check to make sure it is not a primary addr (SMTP)
If Not aOrigCSProxyAddresses(l).StartsWith(“SMTP:”) Then
‘Next, check to see if it is in the history list – if so, we
‘dont need to re-add it because it originated from DomA
If Not mventry(“proxyAddressHistory”).Values.Contains(aOrigCSProxyAddresses(l)) Then
‘Next, check to see if it is already in the outgoing list
If Not csentry(“proxyAddresses”).Values.Contains(aOrigCSProxyAddresses(l)) Then
‘set the flag to false
bExists = False
‘loop through each entry in the outbound proxyAddresses using case insensitivity
For Each csPAddr As String In csentry(“proxyAddresses”).Values.ToStringArray
‘split the two values we are comparing on the colon
sp1 = Split(csPAddr, “:”)
sp2 = Split(aOrigCSProxyAddresses(l), “:”)
If sp1(1).ToLower = sp2(1).ToLower Then
‘the address values match -set the flag to true
bExists = True
‘no need to continue. Exit the loop
Exit For
End If
Next
‘if no match was found, go ahead and add the value back
‘to the list
If Not bExists Then csentry(“proxyAddresses”).Values.Add(aOrigCSProxyAddresses(l))
End If
End If
End If
Next
End If
MA Run Sequence
The last thing we need to address is the MA run sequence. Obviously, we don’t want to update the SQL tables before we export to DomB or we would be overwriting theproxyAddresses history with new DomA values – therefore losing the history. So make sure that you Import and Sync from DomA, Export to DomB (followed by a Delta Import), then Export to the Proxy History MA, and then finally Import and Sync the Proxy History MA to get the history values back into the Metaverse. One thing to note here is that I only got reliable results from the Proxy History MA when I ran a FULL sync after importing.
(ignore)
The need to keep track of attribute history shouldn’t be very common, and we complicated this one with the fact that the attribute was multi-valued, but hopefully the example will help anyone that finds themself in a similar situation.